As machine learning and AI progresses, more and more people are experimenting with deep-learning text-to-image models to generate new and interesting artwork.
Launched in 2023, Stable Diffusion XL is a generative AI model that produces unique photorealistic images, videos and animations from both text and image prompting. The great thing about it is that it uses diffusion technology and latent space, which reduces processing requirements and allows it to be run on home or business computers equipped with GPUs (Graphics Processing Units).
Even better, if you’re running a Katapult VM, you can now set up and run Stable Diffusion XL using ComfyUI.
Getting the right spec
To get the most out of your AI experience, you don't want your spec slowing you down. To effectively run ComfyUI and Stable Diffusion XL, we recommend getting a Rock 24 instance with 24GB of memory, 8 vCPUs, 200GB of storage and running Ubuntu 22.04.
You'll also need to select a GPU from the drop-down menu. Katapult currently offers two types of Nvidia GPU, both of which are great for generating AI images. T4 GPUs are the more budget-conscious option and will take a little longer to generate outputs. L4 GPUs cost a little more but will produce images more quickly - ideal if you're creating a higher volume.
Setting up your server
Once it’s up and running, login using your SSH credentials, update your apt, and then install the current Nvidia driver and utilities. 535 is the current version at the time of writing this article, but check to see if a newer version is available.
apt update
apt install nvidia-driver-535 nvidia-utils-535
You should also make sure everything else is updated as well, for good measure.
apt upgrade
Once those updates are done, reboot the system. After it finishes rebooting, verify that the Nvidia drivers are working as expected.
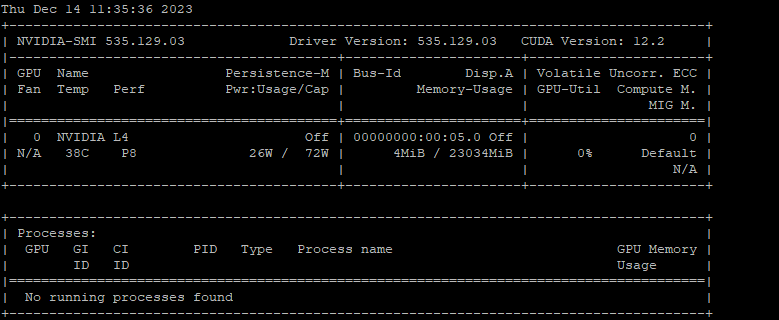
nvidia-smi
This should return a table with the name of your GPU and some statistics, such as temperature and power consumption.
Once your GPU is installed, you can now install ComfyUI. But before you do, you need to install the prerequisites:
apt install python3-pip
pip install torch torchvision torchaudio --extra-index-url https://download.pytorch.org/whl/cu118 xformers
When the prerequisites are in place, it’s time to get ComfyUI and its dependencies.
git clone https://github.com/comfyanonymous/ComfyUI
pip install -r ComfyUI/requirements.txt
With ComfyUI in place, you then need to download the Stable Diffusion XL 1.0 base and its refiner models. These’ll have to be placed into the ComfyUI/models/checkpoints folder too.
wget -P ComfyUI/models/checkpoints/ https://huggingface.co/stabilityai/stable-diffusion-xl-base-1.0/resolve/main/sd_xl_base_1.0.safetensors

wget -P ComfyUI/models/checkpoints/ https://huggingface.co/stabilityai/stable-diffusion-xl-refiner-1.0/resolve/main/sd_xl_refiner_1.0.safetensors
Setting up ComfyUI
Once everything is in place, you’ll need your IP address to make the UI remotely accessible. You can find it in the Katapult control panel. Once you have it, run ComfyUI with your IP address in place:
python3 ComfyUI/main.py —-listen [IP Address]
The output should look like this:
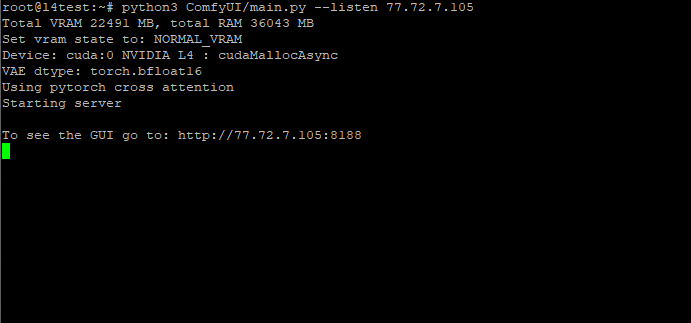
Total VRAM 14931 MB, total RAM 17948 MB
xformers version: 0.0.20
Set vram state to: NORMAL_VRAM
Device: cuda:0 Tesla T4 : cudaMallocAsync
Using xformers cross attention
Starting server

To see the GUI go to http://[your IP Address]
Open up the GUI in your browser, then, from the right-hand menu, select “Load”.
Upload this pre-configured JSON workflow file: workflow.json
Now that you have the workflow in place, it’s time to start having some fun prompting Stable Diffusion!
Prompting Stable Diffusion
You’ll see two text boxes: Positive Prompt and Negative Prompt.
Positive Prompt is everything you want to include in your image, and Negative Prompt is anything you don’t want to be included. You can come up with anything (time to get creative!), or try out the default prompts supplied.

Click the Queue Prompt button on the right, and it’ll start generating images.
It will take a few minutes for the system to generate four images, but once it’s done, you’ll see previews in the Result Without Refiner and Result With Refiner boxes. It's fun to see the difference between the image you might have imagined when writing the prompt and the actual output of the AI. You'll soon discover that writing effective prompts is a skill in itself!
All generated images will be stored on the server in ComfyUI/output, but you can also right-click and save each image onto your computer. Remember to occasionally clear out the Output folder to make room for more images!
If you have any questions, feel free to talk to us and other Krystal clients in our Discord community. Have fun and good luck creating!